ssh-agent : how to type your ssh password once, safely
About SSH Keys
SSH keys provide a more secure way of logging into a server with SSH than using a password alone. While a password can eventually be cracked with a brute force attack, SSH keys are nearly impossible to decipher by brute force alone. Generating a key pair provides you with two long string of characters: a public and a private key. You can place the public key on any server, and then unlock it by connecting to it with a client that already has the private key. When the two match up, the system unlocks without the need for a password. You can increase security even more by protecting the private key with a passphrase.
We strongly recommand that you protect the private key with a passphrase.
Step One : Create the RSA Key Pair
The first step is to create the key pair on the client machine (there is a good chance that this will just be your computer):
$ mkdir ~/.ssh
$ ssh-keygen -t rsa
Once you have entered the Gen Key command, you will get a few more questions:
Enter file in which to save the key (/home/user/.ssh/id_rsa):You can press enter here, saving the file to the user home.
Enter passphrase (empty for no passphrase):It’s up to you whether you want to use a passphrase. Entering a passphrase does have its benefits: the security of a key, no matter how encrypted, still depends on the fact that it is not visible to anyone else. Should a passphrase-protected private key fall into an unauthorized users possession, they will be unable to log in to its associated accounts until they figure out the passphrase, buying the hacked user some extra time. The only downside, of course, to having a passphrase, is then having to type it in each time you use the Key Pair.
$ mkdir ~/.ssh
$ ssh-keygen -t rsa
Generating public/private rsa key pair.
Enter file in which to save the key (/home/user/.ssh/id_rsa):
Enter passphrase (empty for no passphrase): ##########
Enter same passphrase again: ##########
Your identification has been saved in /home/user/.ssh/id_rsa.
Your public key has been saved in /home/user/.ssh/id_rsa.
The key fingerprint is:
4a:dd:0a:c6:35:4e:3f:ed:27:38:8c:74:44:4d:93:67 user@a
The key's randomart image is:
+--[ RSA 2048]----+
|          .oo.   |
|         .  o.E  |
|        + .  o   |
|     . = = .     |
|      = S = .    |
|     o + = +     |
|      . o + o .  |
|           . o   |
|                 |
+-----------------+
The public key is now located in /home/user/.ssh/id_rsa.pub The private key (identification) is now located in /home/user/.ssh/id_rsa
Step Two : Copy the Public Key
Once the key pair is generated, it’s time to place the public key on the server that we want to use.
You can copy the public key into the new machine’s authorized_keys file with the ssh-copy-id command. Make sure to replace the example username and IP address below.
$ cd ~/.ssh
$ ssh-copy-id -i id_rsa user@123.45.56.78
Alternatively, you can paste in the keys using SSH:
cat ~/.ssh/id_rsa.pub | ssh user@123.45.56.78 "mkdir -p ~/.ssh && cat >> ~/.ssh/authorized_keys"Sismo case with shared home
Because your home directory is the same on all hosts inside sismologie network, you juste have to do this :
$ cat ~/.ssh/id_rsa.pub >> ~/.ssh/authorized_keysssh-key with passphrase, with ssh-agent
Adding the following to ~/.bash_profile will automatically start ssh-agent and load the ssh-key(s) on login:
if [ -z "$SSH_AUTH_SOCK" ] ; then
   eval `ssh-agent -s`
   ssh-add ~/.ssh/id_rsa
fi
Now the passphrase must be entered upon every login. While slightly better from a usability perspective, this has the drawback that ssh-agent prompts for the passphrase regardless of if the key is to be used or not during the login session.
Exemple
user@navis:~$ ssh lili
Enter passphrase for key '/home/user/.ssh/id_rsa': ##########
user@lili:~$
ssh-key with passphrase, with ssh-agent only once : xfce Desktop
On desktops, ssh-agents included with the desktop environment, such as the Gnome Keyring SSH Agent, can be a better approach as they typically can be made to prompt for the passphrase the first time the ssh-key is used during a login session and store the decrypted private key in memory until the end of the session.
You will need to have the package ssh-askpass installed.
On debian like system (ubuntu) you can use the command to determine if it is installed or not.
$ dpkg -l | grep ssh-askpass
ii  ssh-askpass              (...)
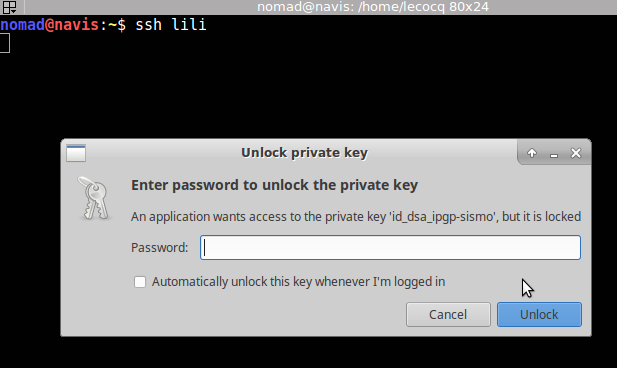
In Xfce Setting go to Session and startup then Advanced and check the box Launch GNOME services on startup. Then logout and login again and you shoud obtain this :

Once the key is unlock you don’t have to unlock it anymore.
source
DigitalOcean : How To Set Up SSH Keys
unix.stackexchange.com : run ssh-add automatically
